Fashion designer turned Teacher | blogger | Coffee and desserts lover | Vlogging enthusiast

Showing posts with label Brows. Show all posts

Dec 1, 2015

How I do my "carrot" brows


Hello babies!
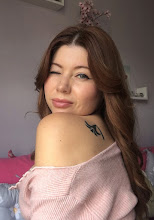
I know I just posted an update on how I used to do my brows a while ago but since I am embracing my readhead-ness again, I had to find a new way to fill them in and make them match my hair. I already have orange brows but I still want them to look fuller and slightly thicker.

My mom just gave me the NYX Eyebrow Pencil in Light Brown (EP01) which is a very soft brown with an orange-ish tone to it that matches my hair perfectly! I also like the fact that it has a brush on one side of the pencil and the color on the other one.
The color is very long lasting and since the tip of the pencil is thin, it's very easy to work with while filling the brows.


I'm super duper happy with this pencil! Honestly, it is my first time using this brand but I highly recommend this pencil to my fellow redheads who want to fill their brows in a very natural way.

Along with this pencil, I'm still using the Kiotis brow gel to keep my brows in place for longer time.

RANDOM NOTE: "My carrot brows" LOL. My mom and I decided to call them like that since she calls me "carrot" because of my orange hair. hehe.

If you want to check my previous How I do my eyebrows posts:
How I do my eyebrows
How I do my eyebrows (UPDATED)
Read More

Oct 27, 2015

How I do my eyebrows (UPDATED)


Hello sweets!
Since my last How I do my eyebrows post, a few things have changed on how I do them. I have two new ways I do it, depending on how much time I have to get ready.
I also have new products I use. Not saying I dont like the Kiotis Colors Brow Pencil anymore but, I've been more into a lighter shade lately.

OK! Let's start!

The way I do my brows during the week, on my working days (because I need something fast) is super simple and easy, the 2 products I use are brow mascaras/gel.


STEP 1. I brush my eyebrows with a transparent gel to shape them the way I want.


STEP 2. I apply the Kiotis Colors Brow Mascara in color Brown (4052) which is slightly lighter than my actual brow color. This way they'll look fuller.


The bad thing about this mascara is that it is not waterproof~ I haven't had a bad disaster yet but once it has contact with water, the color comes easy really easy.


And well, that's pretty much it for my everyday brows.


The other way, the one for the weekends or whenever I have a little more time is using a light brown brow pencil (which I have not details on because I threw away the box a while ago) that /I think/ can match many brow colors.


STEP 1. I gently fill in my brows drawing some soft lines along them. Then I blend them.


STEP 2. I apply the brow gel to help them stay in place for a long time.


And...Voila! Nothing too complicated! I'm happy with these two ways of filling my brows at the moment.


Bye bye~!
Read More

Mar 20, 2015

How I do my eyebrows


Hello dolls!
It's been a while since I started experimenting with my different ways to fill my eyebrows.
I was born with natural thin brows and even though that would be great for some girls, it is hard for me to find ways to shape my brows since there is not much to work with.

You know what they say, "The thicker the brows, the younger you look" (ok! let's just try not to over do them and make them look extra thick and big)

Filling in the brows to make them look thicker has been a huge makeup trend since last year, and after trying different products and techiniques, I finally found the one that works for me. Yay.

People say you should always use a color that is lighter than your actual brow color to do it but, I think it pretty much depends on the look you want to give to your brows.

This is how my brows look like
  So, this is what I'm currently using to fill in my brows:


♥ Kiotis Colors Brow Pencil. "Coffee" This is a medium brown color(?) slightly lighter than my actual brows. It is really easy to work with it and the cool thing about it is that on the other side of the pencil, it has a sponge to blend the color into your brows and create a much more natural look.


♥ Kiotis Colors Brow Gel. (I don't know if this one has a name because all the words it had on it, are gone. Hehe) This one can be used on both, eyelashes and brows. It has no color and it helps my brows to saty in place.

And this is how I fill them in:


♥ I start creating a few soft lines along my brows, focusing on the areas I want to fill in.


♥ Now using the sponge, I blend the color into my brows. First following the direction the hair grows and then on the oposite direction.


♥ To finish my brows I apply some brow gel along my brows, giving them the "shape" I want. This will help them to stay in place for longer time.


It takes me like 5 minutes (or less!) to do this every morning. The fun thing about this is that you can experiment with colors, shapes and products to see which one works best for you. And if you don't like it, you can easily clean it using whatever you use to remove your makeup.

It doesn't make a huge difference but, I like the results. ^^
That's pretty much it for my brows! Hehe.

XOX

Read More

Social Profiles

Twitter Facebook Google Plus LinkedIn RSS Feed Email Pinterest

Popular Posts

Categories

Blog Archive

Search This Blog

Translate

About Me

My photo
Welcome to my little space! A place for me to share with you guys what I love, think and do.

BTemplates.com

Blogroll

About

Copyright © ~ MonStar's little blog ~ | Powered by Blogger
Design by Lizard Themes | Blogger Theme by Lasantha - PremiumBloggerTemplates.com