Fashion designer turned Teacher | blogger | Coffee and desserts lover | Vlogging enthusiast

Showing posts with label Recipes. Show all posts

Dec 28, 2020

Hot Choco Bombs with a twist!


I recieved Chocolate Bombs from Chez Moi Reposteria, proudly made by my friend Jonathan. I've been obssessing with these cute bombs since I tried them earlier this month. 

If you havent tried choco bombs yet, I have a post dedicated to them and the whole experience, hehe.

Let's talk about these bombs first:

The 4 balls came in a cute, pink box 

They came in two different, festive colors...

Red and silver

Green and gold

The four balls are made of dark chocolate and filled with colorful marshmallows. They were really good!

This time I wanted to give a little twist to this drink, keeping it seasonal. I still had some eggnog and decided to add some to the hot chocolate to spice it up a little. Hehe.

To make this you just need milk, a choco bomb and some eggnog.

Prep your mug...

...add the hot milk and enjoy how pretty this is!

Pour eggnog to your liking and stir to mix everything

And, there you have it! The mix of the chocolate with the hint of alcohol is pretty good. It's super easy to make, it's festive, pretty and perfect for this cold weather.

Cheers!!
Read More

Jul 17, 2020

Mon's Kitchen: Bailey's Affogato


Coffee and ice cream, two of my favorite things in this world~ ♡

Bailey's recently came out with new ice cream and popsicles (at least I think they are kinda new...), I bought their ice cream because I tried Haagen Dazs' a long time ago and I loved it.
I have to admit that this one wasn't exactly my favorite so I decided to make affogato with it and it was totally worth it. I enjoyed it a lot more than eating the ice cream alone.

For those who don't know what Affogato is, it's an Italian coffee based dessert. Pretty much ice cream topped with hot coffee. It's something super simple, yet delicious.
Once the ice cream melts, it gives a creamy texture to your coffee, along with sweet foam. The combination is just too good!!
I just think they serve a lot less coffee when they make real affogato, my version has a full cup because, I love coffee.

I couldn't picture the ice cream before melting because, it happened
way too fast, hehe

For my affogato, I used the Starbucks house blend americano by Nescafé Dolce Gusto. This one was not espresso but, is one of the stongest they have.

I've had vanilla and chocolate affogato before but the Bailey's ice cream gives it a liquorish taste without having any alcohol. Perfect for those who don't or can't drink alcohol.


This is a super easy to make drink/dessert I've been enjoying lately. The fun thing is, you can make it using your favorite ice cream, as long as it's milk based. (I think).


I kinda want to try with choco-mint ice cream now~~~~
Read More

Jul 10, 2020

Mon's Kitchen: Spring Rolls


Quarantine has given me the time to practice my cooking a little more and take my time with it. My latest dish, and one I am really proud of, is Spring Rolls.

I know most of them are filled with vegetables and, as much as I like them, I wanted to include some kind of meat so, I made my own filling. Hehe. Then I saw many delicious things you can use to fill them. I wanna try them all! Haha.

Here are the ingredients I used:
Keep in mind I mostly use ready-to-cook or frozen ingredients... hehe


✦ 300g of minced chicken breast
✦ 500g of frozen veggies (broccoli, cauliflower, carrots and corn)
✦ Morimoto Rice Paper (package comes with 10 rice sheets)
✦ Blue Dragon Stir Fry Sauce
✦ White rice

To make the filling, I first cooked the chicken breast and seasoned it with some salt and garlic, then added the defrosted veggies to cook them a little too.


This amount was enough for the 10 rolls. I actually had some leftovers.

My favorite part was definitely making the rolls. It was my first time attempting to make them so I had no idea of how to use the rice paper. Instructions were very simple and easy to follow tho.
You just dip the sheet in water for a couple of seconds to make it softer, it also becomes sticky. Once it is soft, you put the filling and start to roll. The stickiness will help you to seal the rolls.
It was a lot of fun.


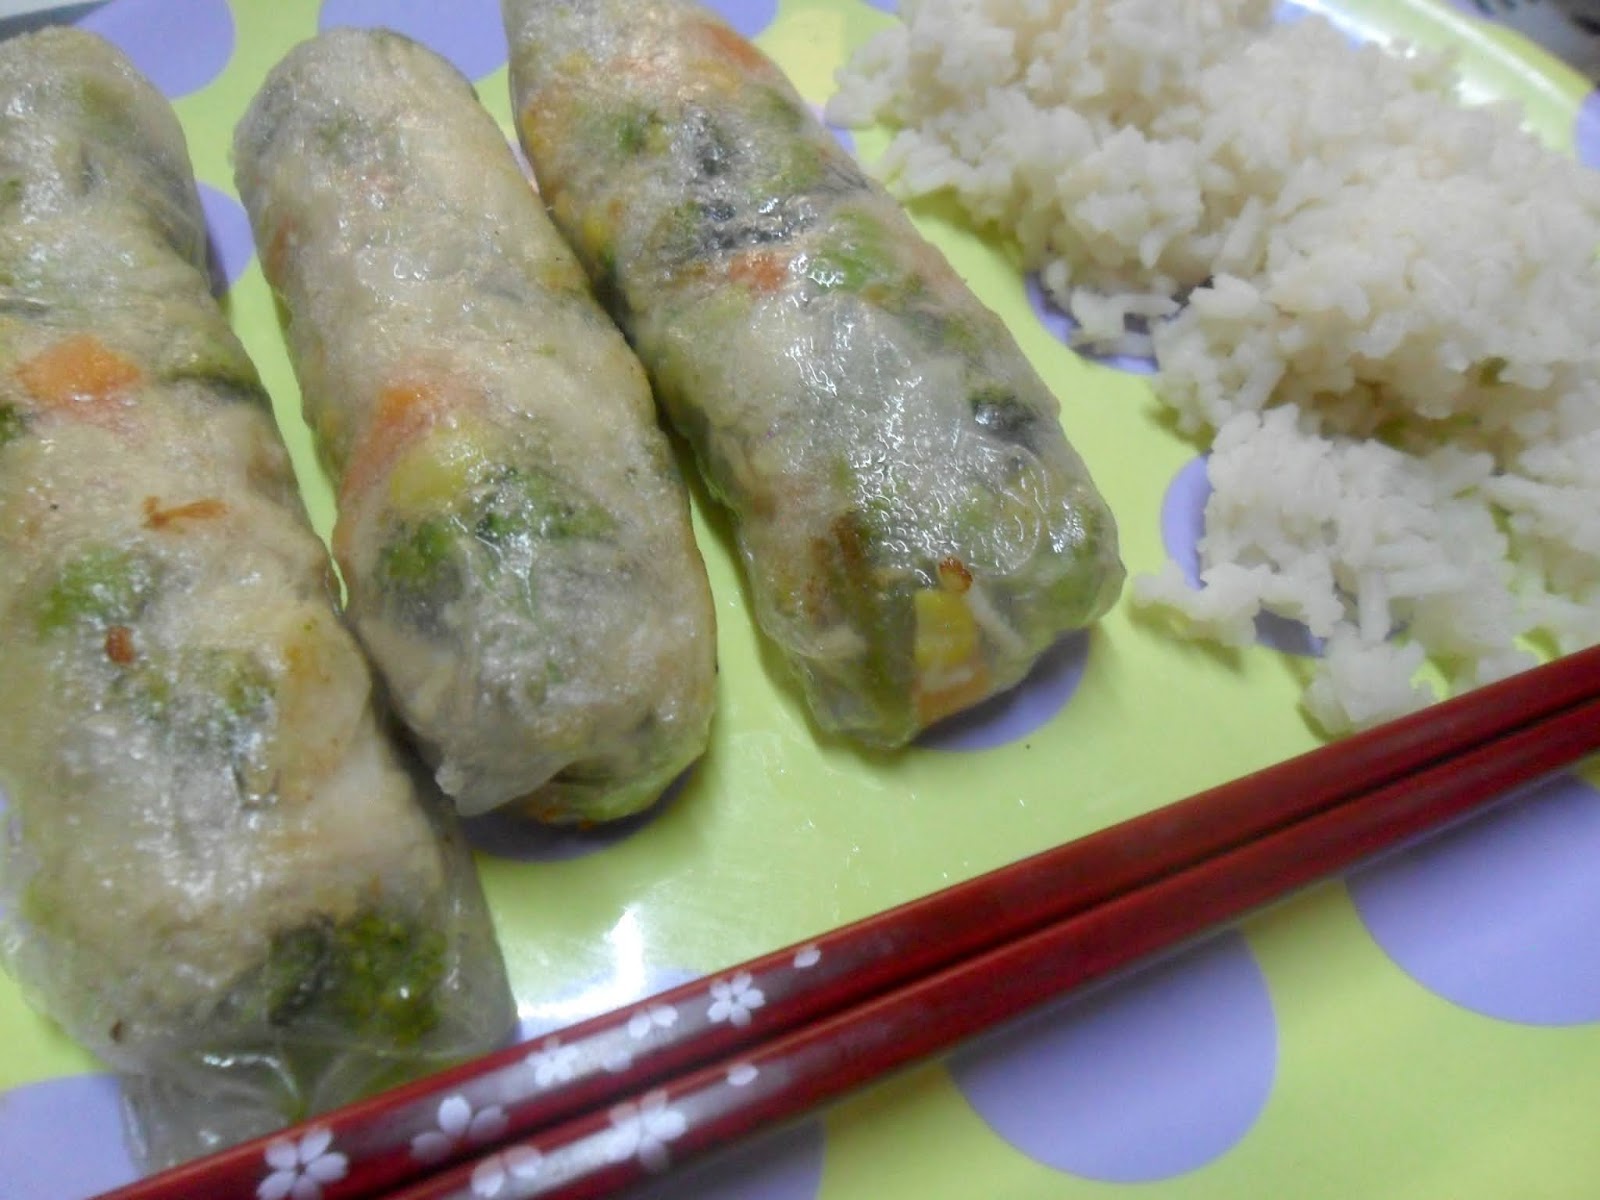
When your rolls are ready, you can eat them like that but, I decided to fry them. I thought they'd stick to the pan and tear but surpisingly, they didn't. For some reason, I was expecting them to become a bit golden brown after frying but I guess that happes when you use some other kind of sheets.

Rolls before frying

I chose white rice as a side dish but guess it was too much rice...? Idk.
The stir fry sause gave them that little extra something. They were really good.


I think they came out a little too big but considering it was my first time making them, they were not bad at all.
😋
Read More

Mar 17, 2018

Mon's Kitchen: Chickpeas & spinach with tomato sauce.


Hi!
Lately I've been feeling a little inspired to cook thanks to my friend Lu. She likes to use different spices and different ingredients which has helped me to experiment a little more when it comes to cooking.
This dish I recently made was a recipe my mom gave me but, I added a few things we already had at home and I am proud to say, it came out really good. Practice makes perfect, right?


〰 Ingredients: (for 3-4 people):
2 cans of chickpeas
1 bag of Spinach (I used the frozen ones)
Chopped onion (to your liking)
Green tomato sause (you can always go for red tomato but, green was the one I had)
Pepper & lemon seasoning

I added some broad beans and carrots leftovers we had as well as white rice because, everything goes well with rice, hehe.

〰  Prepping:
I fried(?) bits of onion with some seasoning for a while before adding the sause, once I felt they were nicely mixed I incorporated the other ingredients.


It is a very simple recipe, and it took me like 20 minutes to finish it. Along with the rice it became a very complete meal and it looked kinda healthy!! At least to me...

I'll be trying more recipes every now and then and I'll try to share them here. At least the ones that work for me.
Hope you guys enjoy this and let me know if you decide to try this recipe!!

Read More

Sep 16, 2017

Mon's Kitchen: Jell-O Creations Dessert Kit: Princess Cups


Hello lovelies!

I have a fun, quick and easy-to-make dessert for you guys. (If I can call it a recipe...)
I was grocery shopping with my mom the other day and found this cute kit. I am a big dessert lover and if it's cute and fun at the same time, it's a must try for me!
I gotta say, this would be a lot of fun to make if you have kids at home! (yup, that's the preschool teacher in me talking.)

I chose the princess kit, which is the strawberry one but they also had a vanilla beach themed.


The kit includes:
* Princess Gummies (which are super yummy!)
*White cookie crumbs
*Pudding Mix


What you need:
3 cups of cold water
Plastic cups.

Let's prepare!
Step 1. Beat the pudding mix and milk in a medium bowl.
Step 2. Layer about 1/4 cup with the pudding, top with 2 tsp of white cookie crumbs and repeat the layers.
Step 3. Top with some princess gummies! Serve and eat!


It only takes like 10 minutes to prepare and I have to admit it was fun!
It says you can get 6 cups of it but I have to say the cookie crumbs were not enough. It'd be fun to use different kinds of crumbs, including chocolate to add different flavors!


Taste is good, presentation is cute...I'll definitely buy the beach one next time!


Read More

May 3, 2016

Mon's Kitchen: My favorite breakfast at the moment


Hello there lovelies!
It has been a while since I wrote something food related. Truth is, I've been cooking a little more often now to practice and improve my cooking. So hopefully I'll make some new cooking posts in the future.
For now, I want to share with you my favorite breakfast at the moment. And I mean, favorite. I've been obsessing over it for a while now.

Bagels are not something new or weird, I know. But we kinda made our own recipe for a quick, easy-to-make and yummy breakfast. When I eat breakfast I usually need to eat something salty, something sweet and of course...my beloved morning coffee.

All you need is:
♥ Bagels (we usually go for natural ones but, guess it's up to you)
♥ Manchego cheese
♥ Italian tomato sauce (usually buy Hunts' or Prego)
♥ Nutella
♥ Coffee hehe

Cut bagels in half, one will be the sweet one and the other half the salty. The sweet one will stay natural for now and on the other one we put some tomato sauce and a slice of cheese on top.
We put them both in the electric oven for about 10 minutes (depends).  I usually like to wait until the cheese gets a little toasted(?).
Once they are ready, we apply some nutella on the natural one and...that's pretty much it! A sweet bagel and a salty one.
I honestly love how the toasted cheese tastes with the tomato sauce. It is such a yummy mix!


As for my coffee, I've been loving the Necafe Vanilla coffee. I think it's limited edition but, I've seen it at walmart for a while so, hopefully it'll last longer. It is really good, taste and smell. Sometimes I like to add some cream from coffee mate. They are super cheap, really good and add that extra something to my morning coppie!

And, that is it for my fave breakfast at the moment! I find it easy to make, fast and yummy.
If you give it a try, let me know how you like it! What's your favorite thing to eat for breakfast?


Read More

Oct 30, 2014

Mon's Kitchen: Jello Brains~!


Hello zombie babies! 

It took me a while to finally use the brain mold I got earlier this month from Wal-Mart, I was especially excited about it because I wanted one for a long time now.
So, the recipe is super simple! I bought a package of strawberry jello and a 1lt. of milk. I wanted to use milk jello because it'd give it a more realistic brain color but, you can use any color you want.

Instructions:

1. Heat the milk, once is hot enough add the jello and mix.


2. Pour the mix into the Brain mold and let it cool for lika an hour or so.


3. When the jello was cool and firm I removed the mold using some hot water at the top of it to help the jello slip out of the mold.

Ta Da! Now I have a brain!
To add an extra something to my brain I used some strawberry syrup, I think it makes it look a little bit more real~ hehe


Since the mold is small, I had some jello miz leftover, so I just filled little jars and decorated them with skull candy bones to give them a Halloween look.


Super quick and Halloween-ish dessert!


Read More

Jul 8, 2014

Mon's Kitchen: Bean thread with chicken and veggies.


I bought a bag of bean thread noodles a while ago and I've been meaning to cook a traditional Chinese meal with them but honestly, I didn't had the time to look for a recipe. So last weekend I decided to do some cooking and use them. Even though my last minute recipe was kinda improvised, it turned out really good!
I never tried bean thread noodles before so I didn't knew what to expect. I could say they don't really have a taste but, trying them with other flavors makes a good mix.
I went for something simple, chicken and Oriental mix veggies.

Ingredients:

* Chinese Bean Thread Noodles (or Cellophane noodles)
* Broccoli
* Mushroom
* Water Chestnut
* Red Pepper
* Chinese beans
* Chicken strips
* Soy Sauce

Let's start with the chicken, since it took the longest to cook. I waited until they were fully cooked to chop them into small squares and added a little extra flavor using some soy sause and an other seasoning thingy we had at home. Then I let them fry a little. (I don't know why I always want things to fry~~~)


Moving on to the noodles. You need to pour boiling water over the noodles and soak them for 5 - 10 minutes. Drain the noodles as they turn soft.

The bag had 4 small packages of soup. Each was enough for one person. 

This is how the noodles look before cooking.

Boiling, boiling~~~ ♪
Ready!
Once the chicken and noddles were ready I put everything together and added some veggies.
It was an easy to make and very light food for a rainy Sunday afternoon.
I'm definitely planning on cooking a real Chinese recipe using this noodles but, it was a good way to try Bean thread for the first time.

xox

Read More

Social Profiles

Twitter Facebook Google Plus LinkedIn RSS Feed Email Pinterest

Popular Posts

Categories

Blog Archive

Search This Blog

Translate

About Me

My photo
Welcome to my little space! A place for me to share with you guys what I love, think and do.

BTemplates.com

Blogroll

About

Copyright © ~ MonStar's little blog ~ | Powered by Blogger
Design by Lizard Themes | Blogger Theme by Lasantha - PremiumBloggerTemplates.com